Difference between revisions of "Ingenico Telium 2 Payment Processing Terminal Setup"
(→Ingenico USB Driver Install) |
(→Microsoft USB CDC Driver Install) |
||
| (30 intermediate revisions by the same user not shown) | |||
| Line 1: | Line 1: | ||
{{Template:C9Header|Ingenico IPP320 Setup}} | {{Template:C9Header|Ingenico IPP320 Setup}} | ||
=Overview= | =Overview= | ||
| − | Ingenico | + | Ingenico Telium 2 devices are the EMV terminal flagship of the industry, capable of all required functions, including NFC processing and providing the best overall value for a wired terminal. |
| + | All the popular Ingenico Payment Terminals, such as IPP320, IWL250, etc are Telium 2 devices. | ||
=Where to buy?= | =Where to buy?= | ||
You can purchase the Cloud9 and EMV compliant devices directly from Cloud9 Payment Services. [http://cloud9paymentgateway.com/contact Contact us today!] | You can purchase the Cloud9 and EMV compliant devices directly from Cloud9 Payment Services. [http://cloud9paymentgateway.com/contact Contact us today!] | ||
| + | |||
| + | =Firmware and Programming Requirements= | ||
| + | The pin pads must be injected with RBA 16.02 or later and appropriate TDES Debit key. EMV kernel used is 4.67. | ||
| + | |||
| + | =Environment Requirements= | ||
| + | ==Remote Desktop and Windows Terminal Services== | ||
| + | If you are using the pin pads with Windows Terminal Services, please see [[Payment Terminal Setup for Remote Desktop Windows Terminal Services]] | ||
| + | |||
| + | |||
=Setup= | =Setup= | ||
| Line 13: | Line 23: | ||
Some devices are shipped without [[http://cloud9paymentgateway.com/payment-processing-terminalpin-pad-tdes-injection-key-debit/ Injection Keys]] initialized. In this case, you will see the screen below: | Some devices are shipped without [[http://cloud9paymentgateway.com/payment-processing-terminalpin-pad-tdes-injection-key-debit/ Injection Keys]] initialized. In this case, you will see the screen below: | ||
<br> | <br> | ||
| − | {| | + | {| style=" border: 1px dashed red; width: 100% |
|- style="vertical-align: top;" | |- style="vertical-align: top;" | ||
|[[File:ingenicoInjectionScreen.jpg|none|400px|Ingenico Key Injection Screen]] | |[[File:ingenicoInjectionScreen.jpg|none|400px|Ingenico Key Injection Screen]] | ||
| Line 28: | Line 38: | ||
|} | |} | ||
| − | =Version Check= | + | =RBA Version Check= |
| − | { | + | {{Template:Ingenico IPP320 Version Check}} |
| − | + | ||
| − | |||
| − | |||
| − | |||
| − | |||
| − | |||
| − | |||
| − | |||
... | ... | ||
<br> | <br> | ||
| − | |||
| − | |||
| − | |||
=Ingenico USB Driver Install= | =Ingenico USB Driver Install= | ||
| − | {| | + | #Download the Ingenico Device Driver from this folder: '''[http://cloud9paymentgateway.com/files/Ingenico/USB http://cloud9paymentgateway.com/files/Ingenico/USB]''' |
| + | #Unzip and run the installation file | ||
| + | {|style=" border: 1px dashed red; width: 100% | ||
|- style="vertical-align: top;" | |- style="vertical-align: top;" | ||
|[[File:ingenicoUSBDriverComPort.jpg|none|500px|Ingenico Usb Driver Setup]] | |[[File:ingenicoUSBDriverComPort.jpg|none|500px|Ingenico Usb Driver Setup]] | ||
| Line 55: | Line 57: | ||
|} | |} | ||
| − | {| | + | {| style=" border: 1px dashed red; width: 100% |
|- style="vertical-align: top;" | |- style="vertical-align: top;" | ||
|[[File:ingenicoUSBUninstall.jpg|none|500px|Ingenico Usb Driver Setup]] | |[[File:ingenicoUSBUninstall.jpg|none|500px|Ingenico Usb Driver Setup]] | ||
| Line 62: | Line 64: | ||
<br> Click Next to proceed with the install | <br> Click Next to proceed with the install | ||
|} | |} | ||
| + | |||
| + | =Microsoft USB CDC Driver Install= | ||
| + | |||
| + | #Download the Microsoft USB CDC Class Device Driver from this folder [http://cloud9paymentgateway.com/files/Microsoft/USB http://cloud9paymentgateway.com/files/Microsoft/USB] | ||
| + | #Unzip and run the installation file | ||
| + | |||
| + | =CreditLine Pin Pad Setup= | ||
| + | → '''Skip this step if you are not using 911 Software CreditLine''' | ||
| + | |||
| + | {| style=" border: 1px dashed red; width: 100% | ||
| + | |- style="vertical-align: top;" | ||
| + | |[[File:CreditLinePinPadSetup.jpg|none|400px|CreditLine PinPad Setup]] | ||
| + | | | ||
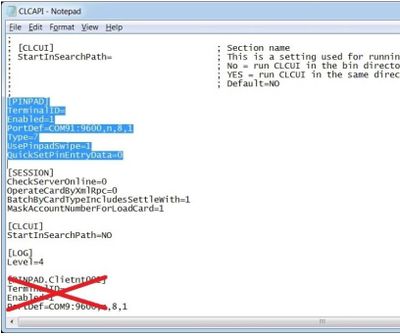
| + | Open the \911\DATA\CLCAPI.INI file with any text editor, such as NotePad | ||
| + | ;Under [PINPAD] section | ||
| + | #Set Enabled=1 | ||
| + | #Set UsePinpadSwipe=1 | ||
| + | #Set Type=7 (7 means iPP320 with RBA) | ||
| + | #Set PortDef=COM91:9600,n,8,1. | ||
| + | #Delete all text below the [LOG] section. | ||
| + | #Save the file | ||
| + | |} | ||
| + | |||
| + | =Troubleshooting= | ||
| + | If you are seeing an infinite loop around the copyright screen and "Lane Closed" message, the units memory may be overloaded. | ||
| + | To resolve: | ||
| + | #As the terminal boots up, press the F key continuously | ||
| + | #Scroll down to Change Sys Size > press Enter key | ||
| + | #Key in new size of 25 | ||
| + | #Press Enter key and wait for a successful changed message to be displayed on the screen | ||
| + | #Reboot terminal | ||
| + | |||
| + | If this does not resolve the boot loop issue, the memory is too full to hold the RBA load. | ||
| + | |||
| + | {{Template:C9Footer|Setup}} | ||
Latest revision as of 23:01, 1 June 2017
Cloud9 Payment Gateway Documentation. This site can also be reached at http://docs.cloud9paymentgateway.com
Contents
Overview
Ingenico Telium 2 devices are the EMV terminal flagship of the industry, capable of all required functions, including NFC processing and providing the best overall value for a wired terminal. All the popular Ingenico Payment Terminals, such as IPP320, IWL250, etc are Telium 2 devices.
Where to buy?
You can purchase the Cloud9 and EMV compliant devices directly from Cloud9 Payment Services. Contact us today!
Firmware and Programming Requirements
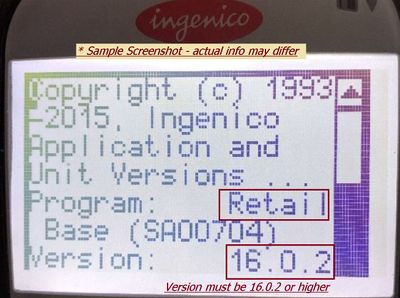
The pin pads must be injected with RBA 16.02 or later and appropriate TDES Debit key. EMV kernel used is 4.67.
Environment Requirements
Remote Desktop and Windows Terminal Services
If you are using the pin pads with Windows Terminal Services, please see Payment Terminal Setup for Remote Desktop Windows Terminal Services
Setup
Connect it with the supplied USB cable to the PC and power on.
→ Note: you may see the message This Lane Is Closed. This indicates normal device operation waiting for instructions from the PC.
Key Injection Initialization
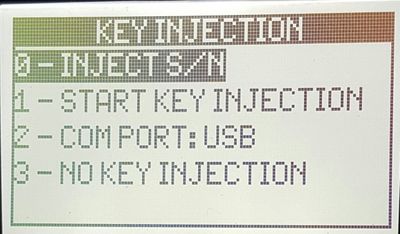
Some devices are shipped without [Injection Keys] initialized. In this case, you will see the screen below:
|
→If you do not see this screen, proceed to the next section #Version Check
|
RBA Version Check
The Retail Business Application (RBA) is the internal programming of the Ingenico Pin Pad, not to be confused with the firmware. RBA enables advanced functionality of the pin pads and provides communication services to Cloud9 Payment Device Controller (PDC), which serves as the local device driver for the payment devices.
Normally, you will not be required to perform an update of RBA, unless a new industry requirement necessitates a fresh version of RBA from Ingenico.
|
...
Ingenico USB Driver Install
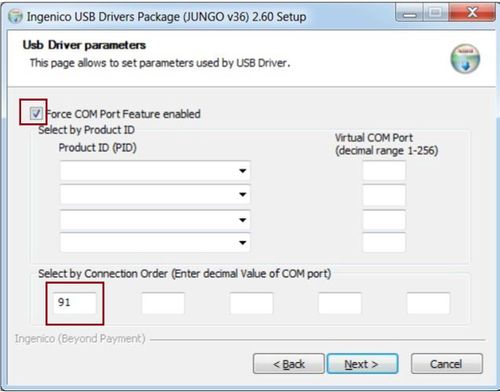
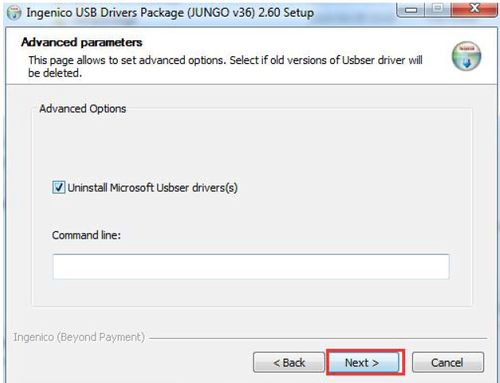
- Download the Ingenico Device Driver from this folder: http://cloud9paymentgateway.com/files/Ingenico/USB
- Unzip and run the installation file
COM port)” section. |
|
Microsoft USB CDC Driver Install
- Download the Microsoft USB CDC Class Device Driver from this folder http://cloud9paymentgateway.com/files/Microsoft/USB
- Unzip and run the installation file
CreditLine Pin Pad Setup
→ Skip this step if you are not using 911 Software CreditLine
|
Open the \911\DATA\CLCAPI.INI file with any text editor, such as NotePad
|
Troubleshooting
If you are seeing an infinite loop around the copyright screen and "Lane Closed" message, the units memory may be overloaded. To resolve:
- As the terminal boots up, press the F key continuously
- Scroll down to Change Sys Size > press Enter key
- Key in new size of 25
- Press Enter key and wait for a successful changed message to be displayed on the screen
- Reboot terminal
If this does not resolve the boot loop issue, the memory is too full to hold the RBA load.
From the makers of Cloud9 Payment Processing Gateway and Creditline Credit Card Processing Software
