Ingenico Telium 2 Payment Processing Terminal Setup

From Cloud9 Payment Processing Gateway Documentation
Revision as of 21:29, 4 August 2016 by Zorrik (talk | contribs) (Key Injection Initialization)

Jump to: navigation, search


Cloud9 Payment Gateway Documentation. This site can also be reached at http://docs.cloud9paymentgateway.com

Overview

Ingenico IPP320 is the EMV terminal flagship of the industry, capable of all required functions, including NFC processing and providing the best overall value for a wired terminal.

Where to buy?

You can purchase the Cloud9 and EMV compliant devices directly from Cloud9 Payment Services. Contact us today!

Setup

Power on the device and connect it with the supplied cable to the PC

Key Injection Initialization

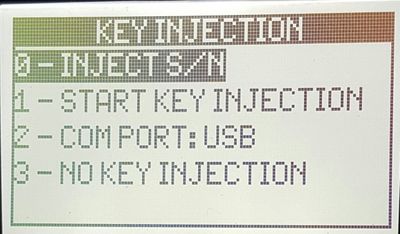
Some devices are shipped without [Injection Keys] initialized. In this case, you will see the screen below:

Ingenico Key Injection Screen

If you do not see this screen, proceed to the next section #Version Check
To dismiss the screen do the following:

PRESS 3, wait until pin pads reboots and the following is displayed
  • 0 Delete key
  • 1 Delete key and create RKI
If you see the above message
:
  1. ) Press 1 to Delete Key and create a new Key Index
  2. ) After a reboot, proceed to [#Version Check] section below. Eventually, you should see the message This Lane Is Closed
→If after pressing 3, the pin pad cycles back to the original KEY INJECTION screen with options 0-3, the pin pad is faulty and needs to be replaced. Contact us for instructions

Version Check

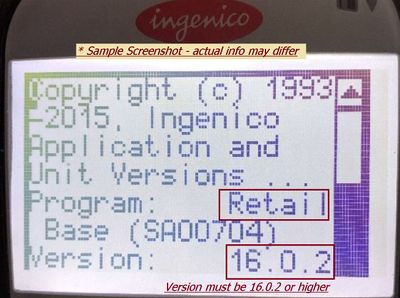
Ingenico Version Screen
On initial powerup you will be able to view the splash screen with copyright and application info.
It should be similar to the screen on the left
  1. Program should be “Retail Base”
  2. Version number should be 16.0.2 or higher
→ if you see the wrong info on the splash screen, the appication will need to be updated. Contact us for instructions

...


From the makers of Cloud9 Payment Processing Gateway and Creditline Credit Card Processing Software

[[Category:{{{1}}}|{{{2}}}]]

Ingenico USB Driver Install

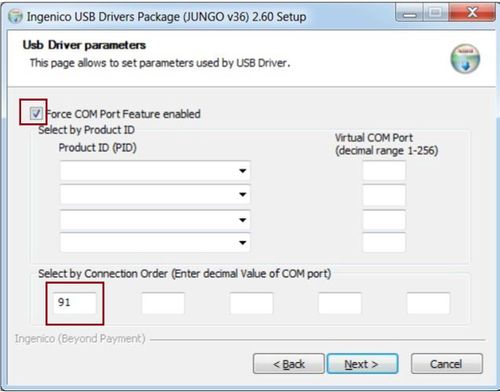
Ingenico Usb Driver Setup
Make sure
  1. “Force COM Port Feature enabled” check box is checked
  2. Enter “91” in the first box under “Select by Connection Order (Enter decimal Value of

COM port)” section.